 Dyeing wool is an art in itself, worthy of all the time you would like to give it. The more you dye, the more predictable the results can be. But what if you are going for unpredictability? Dyeing wool for the magic of seeing dramatic and beautiful colors unfold! Then read on!
I have been experimenting with a process called Ice Dyeing. A fiber friend told me about this method of dyeing wool roving used for spinning into yarn. The pre-mordanted, undyed wool roving is spread out on a screen or rack and then covered with ice. Dye powders are then sprinkled over the top. The melting liquid drains through to a bucket below. When the ice is completely melted, the roving is steamed to set the colors.
Well, I thought that this idea could be adapted to wool fabric. I started playing with the process, making some changes along the way. The results were surprising and unlike anything I have seen.
SUPPLIES
dye powders The dyes used for wool and other animal fibers are called acid dyes, and they come in many brands. The two that I use most often are Cushing Acid Dyes and Pro Chemical & Dye Acid Dyes. The colors I like to use are of a muted palette.
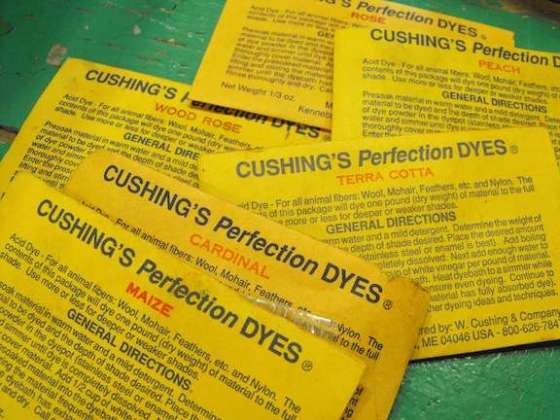
In Cushing Dyes I used colors like Maize, Peach, Rose, Terra Cotta, and Cardinal for this experiment. I was going for more of a warm finished color. Use whatever colors you have in dye powders and see what happens!
The Pro dyes that I used were soft colors like Clay, Gold, and Pink Sand.
citric acid or white vinegar This is the mordant, or what sets the color (along with simmering or steaming) in the wool. I like to use citric acid because it smells less and takes up less storage space than vinegar. I don’t measure my acid, but for a 1/2 yard of wool you need to use about 1+ teaspoon of citric acid, or 1/4 – 1/2 cup of vinegar .
dish soap A touch of Dawn or a product called Jet Dry (used in dishwashers) is all you need to make your wool soak in the water. Whatever dish soap you have at the sink will work.
wool in a light faded kind of color Since I don’t want any white showing in my finished piece, I use a light-colored wool like gray, tan, soft yellow, taupe, etc. For my experiment I used a light gray/taupe color. I like to dye a full yard at a time, however you may choose to dye 1/2 or a 1/4 yard piece.
ice Make sure that you have plenty of ice for this project. You will need enough ice to cover the top of your wool in the pan. For my 1 yard piece of wool, I used my whole ice drawer plus 2 or 3 additional ice-cube trays of ice. You could also buy a bag of ice cubes or crushed ice. If you use crushed ice the technique may come out a bit different. When in season, snow is another option, which may come out interesting.
electric turkey roasting pan This is a wonderful dye pot! Look for them at thrift stores or yard sales.
 This pan has a lot of room for dyeing wool. Of course, as with all dye equipment, it is dedicated to dye use only.
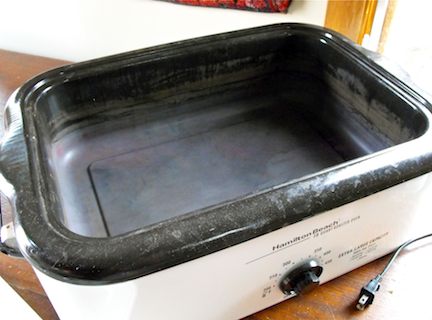 Plug it into a regular socket, and now you can dye anywhere. Even out on the back porch!
ICE DYEING WOOL FABRIC – 1 yard
Pre-mordant your wool by soaking it in just enough warm to hot water to cover it, that has a several drops of dish soap and a 1/4 cup of citric acid dissolved in it. Add wool to the roasting pan, reserving liquid for later.
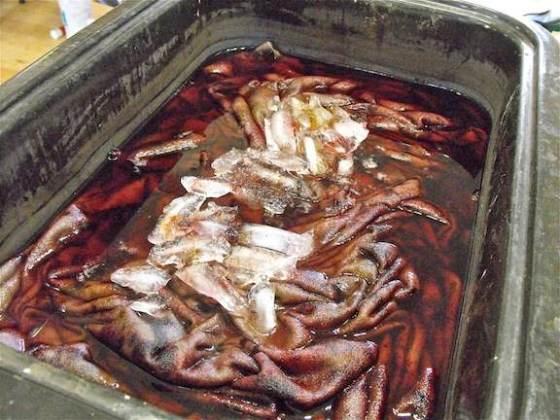
 Scrunch the wool around so that it is one layer thick, accordion style. Add some of the reserved liquid to cover the bottom of the pan by about 1/2″ deep or so.
If you are using less wool, there will be less scrunching to do. I think that scrunched up wool will add to the effect you get, so make sure you have some folds and pleating.
 With dry hands, completely cover the wool with at least one layer of ice, more here and there is good.
 Start sprinkling your first color on top of the ice. Wear a dust mask for this part of the process. I aimed for an ice-cube, and sprinkled the color in several places.
 Repeat this process for each color. Using several colors is more interesting than just one or two.
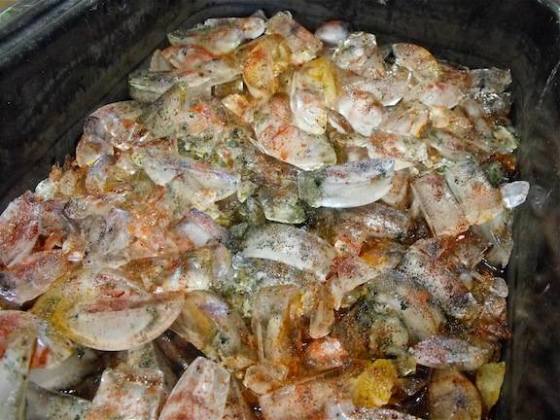 I want to catch an ice-cube with the dye powder so that it doesn’t just form a solid dark blob of color on the wool. Some dye powder will fall onto the wool, but the goal is to let it slowly dissolve on the ice-cube, and drain down onto the wool on its own.
 Don’t disturb the ice, and let it do its thing. The ice will start melting and dripping onto the wool below almost immediately. You can let it go slow, but I am not that patient, so I put the cover on and turned the roasting pan on to a temperature of 300° for 1 1/2 hours.
 Part of the fun is peeking in on the wool from time to time to see what the colors are doing.
 When time was up and the wool had set much of the colors that were in the water, I poured out the liquid into the sink. It is okay if color remains in the water.
Try to reserve judgement until the wool has been dried. Wet wool can look dark and dismal, so be patient.
Through the steam, this was my first peek at the ice dyeing magic.
 I gave the wool a cold water rinse, and then ran it through the spin cycle in my washer to remove the excess water. Then it went into the dryer. I added an old towel or two in with the wool to help it move around and dry nice and fluffy.
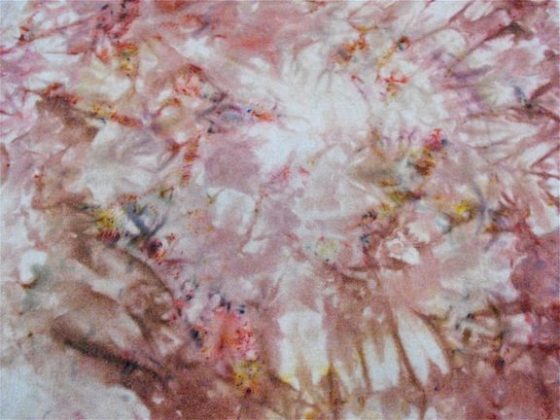 I popped it out of the dryer. I thought the finished wool was gorgeous!
 The effect was like flowers and butterflies through a soft focus lens.
 Dare I cut into it? Should I frame it?
I hope that you will have fun with this process, and experiment with what I have done. Sharing crafty knowledge is my joy! I have a feeling that you are going to run right out and give this easy dye method a try! What do you think?
Be so kind as to refer others to my tutorial here on my blog and let them know where you learned about ice dyeing on wool fabric.
Happy creating, Karen





Oh, Miss Karen ~ once again, you are just full of good ideas!! It’s like looking thru a kaleidescope! A very unusual looking result!! Wonder what kind of effect it will have in a hooked piece?
LikeLike
thanks, alice! yes, now comes the time to play with the wool. every slick will have different colors and drama!
LikeLike
super cool! Im going to try this. Thank you!
LikeLike
Oh, oh, OH! Just look at that Alice in Wonderland wool! I am completely smitten and I CanNot WAIT to give this a try! Thank you for sharing your triumphant experiment, Karen!
rebecca
LikeLike
thanks rebecca, for the kind words and for linking my post to your blog!
LikeLike
Pingback: karen’s incredible wool | the simple quiet
That is so gorgeous Karen, but it certainly would be a shame to cut it up wouldn’t it? How will you use it to get the best effect of the lovely patterns? I love dyeing, but always like it better in the piece. Well done.
Cheers
Chris from Oz
LikeLike
thanks, chris. yes, i always feel this quandary when i dye a lovely piece of wool. i like to use such a wool showcased in a single row, such as in a stem, the veins of a leaf, in a borderline.
LikeLike
I would love to know if you actually hooked with this wool and what that looked like.
I think it would be great to add darker mottled peach and rose, etc with it for depth and texture! It is just beautiful!
LikeLike
Karen,
What a fun and beautiful technique! Was just wondering when you cut into the wool if you get “white core”….I was always told that was from your wool getting too cold and the fibers locking up….as with many things I’ve been told about dyeing, it could be a total myth. This is definitely a “must try” for me in the future!
Thanks for sharing!
LikeLike
i believe you get a white core when the dye strikes too fast, dyeing the first thing it comes in contact with, which is the outer fibers of the wool. the inner fiber don’t get dyed at all because all the color lands on the outside. my wool would not have a white core because i am using wool that is a color already. if the wool was white, it may be that it would be lighter inside. certainly there is a difference in the effect from the front (where the dye water first lands on the wool) to the back of the piece of wool.
LikeLike
I always thought that you get a white core when the wool isn’t wet all the way through.
LikeLiked by 1 person
This looks like a fun experiment. Thank you for sharing. Looks like this would make an interesting background all by itself!
LikeLike
yes, it is so dynamic with so many intermixed colors. thanks for commenting sondra!
LikeLike
Love this but how do you steam it?
LikeLike
you don’t need to steam the wool with this technique as it is simmering in the turkey roaster. simmering sets the wool. for other techniques you would need to steam set the color.
to steam set, think of steaming veggies. you can suspend the wool with a metal veg steamer (resale shops have them. remember: for dye kitchen use only). put your dyed wool in a plastic bag or wrap it in plastic wrap. steam for 40 minutes and then rinse and dry.
LikeLike
Very interesting! Thanks for sharing!!!
LikeLike
I love the look of this. I was wondering if you put the wool on a rack over the water, so i didn’t sit in the water, would you get a different look? Maybe not enough color in the wool? I have one of these roasters full of set wax (from when I used to make candles) so I am planning on dumping out the wax and try this…maybe after Thaksgiving. Thanks for the lesson. If anyone tries this with a rack, I hope they share their results.
LikeLike
yes, i tried going with the original idea that was used for dyeing batting. there is less body color with that technique, less intermixing on other parts of the wool. and then there is the additional step of steaming the wool to finish the process. different finished wool, but still worth trying.
LikeLike
What a great idea! I bought one of these too for $17 and it is in excellent condtion, almost a shame to use it for dye.
I never thought of using it for wax. You could batik a large piece with that much wax.
LikeLike
A friend of mine tried the snow-dyeing. It made some of the most beautiful fabric I’ve ever seen! I was lucky enough to be able to pick a piece for myself and it looks like a fantasy garden. 🙂
LikeLike
lucky you! thanks for commenting today.
LikeLike
Absolutely love this Karen and will definitely try it sometime. Thanks for sharing.
LikeLike
wow karen i love the finished wool! gorgous and cant wait to try this sometime this winter! and thanx so much for showing us step by step! will help me sooo much!! enjoy your evening!
LikeLike
Do you think that I could use a large roasting pan, covered in the oven. I don’t have an electric turkey roaster. Thanks, Trudy Moye
LikeLike
yes, that should work. however as it is your oven, take precautions to keep it covered with no fumes or steam escaping.
LikeLike
Have to try!
LikeLike
Pingback: Melody Johnson On Dyeing the Lazy Way « Diannajessie
Okay, I never dye my own wool, but this turkey roaster and ice dyeing looks like fun! After Thanksgiving is here and gone, I’m going to start hitting the thrift shops and see if I can find a roaster. Also, thanks for the tip in your previous post about using a dog comb to clean a frame. This has been bugging me for awhile, and have not come up with a solution. Obviously a dog comb would work! And….. I’m loving my triloom (finally). I’m working away on my new shawl after some disappointment with my practice piece. I’m wishing my loom was a bit bigger, but I think what I have will work fine for what I want to do. I also may try the crocheted edge on this shawl when I’m done weaving. Thanks for all your good tips and advice, Karen.
Happy Thanksgiving!
Dulcy
LikeLiked by 1 person
I am anxious to try ice dyeing—tomorrow. Two questions; how many different colors do I use with each batch and how much of each color?
Thanks,
Martha
LikeLike
this is strictly a playful method of dyeing. experiment with the colors you love, sprinkling small amounts in 3 to 5 places. i would use at least 3 colors, typically 6 or 8, some of them related colors, such a red, peach, and burgundy. and then also use a couple neutrals like tan, rust, brown, and grays. have fun and share your results with me.
LikeLike
Hi Karen,
Have you used a roaster to overdye wool or to marry wool?
My studio where I teach does not have a kitchen. I would like to demonstrate dyeing some how.
LikeLike
yes, you could. but it is more like a crock pot, with a slower temperature change, needing the lid on to stew things. you might also look into that new technology on the market… induction cooking burners. they can get really hot, but i think need special pots?
LikeLike
Hi Karen,
Just saw this post. It’s great! Have you tried just doing it outside with the heat of the sun? if so, how would you set the wool after? Also, when you are dyeing your wool, do you have something in mind? How do you know what to do with it after?
LikeLike
susan, you could use solar energy for this method. after everything melts steam the wool to set the colors for 40 minutes. use a vegetable steamer and put the wool in plastic wrap or a plastic grocery sack to keep the water away from the wool. when i dye wool i usaully dye for my stash, which means i dye colors that i need to round out my assortment. so for the next project i pick from what i have on my shelves. i know what to do with it by seeing how it blends and contrasts with other colors. if a combination excites me, i know i am on to something!
LikeLike
Karen,
Although I own everything needed to dye, I haven’t done any but penny dyeing. One reason lately is my diminished strength coupled with the worry of dealing with hot water. Now this method using ice might actually get me started. I live nowhere close to any other hookers that my efforts must be done alone, not always so safe. Thanks for sharing.
trisha
LikeLike
trisha, thanks for commenting. yes, this method would be a good place to start. remember that any dye method you use, you can just let the wool sit in the pot until it cools before removing it. so if you are patient, there is no need to deal with the pot of hot water. also, you can remove water from the pot before lifting the whole thing to dump into the sink. another method that you might enjoy is marbleizing. find my book here:
LikeLike
Awesome!! Will try this for roving and wool fabric
LikeLike
I love the whole idea. Just got some Koolaide, want to try that and do some knitting yarn and maybe some cotton too as I quilt as well. Brilliant
LikeLike
koolaid is fun and very vibrant!
LikeLike
I just found this site. Thanks for the tutorial. I have done a similar technique with my roving for spinning, but can see the possibilities for wool cloth. I have always told my students and friends to be happy with whatever comes out. I like to just have fun and experiment and it is always magic. I am not a chemical lab kind of dyer-more free to just let what happens happen.
LikeLike
thanks for commenting and sharing your thoughts on the fun of dyeing wool!
LikeLike
Wonderful technique! I’d like to give it a try. Is a turkey roaster good for small batches of immersion dyeing? Does the water get up to a simmer, or is it more like a crockpot where the water just doesn’t get wuite that warm? ?
LikeLike
you can set the temperature quite hot. i think you could dye like casserole dyeing as you would put the lid on to let it get up to temp. have fun experimenting!
LikeLike
I love ice dying fabric with fiber reactive dyes but the are not very vibrant on silk. I hear they need acid dyes.. Do you have experience ice dying silk? I wonder if the same dye and technique for wool would work on silk since they are both protein fabrics. Thanks for your help and I love the look of your ice dyed wool!
LikeLike
i have not tried this technique on silk but the dyes are suited for silk fibers and should be more vibrant that fiber reactive dyes. i would love to see any results you may come up with!
LikeLike
Pingback: Some highlights from the past | primitivespirit
I have to try that. Ihave a roaster for dying. Thanks for the how too’s.
LikeLiked by 1 person
Hi, Just found your blog post on ice dyeing, I did a similar post on my blog using ice crystals from my pool in late March. It was so much fun, I blogged about it. I will have to look for an old turkey roaster, used enamelware and oven to dye mine. Your piece came out really great. I am a rug hooker for over 25 years, love dyeing my own recycled wool. Great post.
LikeLiked by 1 person
I loved reading this, always looking for new ways of dyeing wool, I posted a similar post on my blog using ice crystals from my pool. Been rughooking over 25 years, your piece turned out really neat.
LikeLiked by 1 person
thanks marilou! dyeing is so satisfying because it is just another way to enjoy working with color! have fun with it!
LikeLike
Wonderfully informative. Thank you!
LikeLike
I just tried cotton “snow dyeing” last week and I’m loving it! Now, of course, I want to try dyeing wool. As I have a stove top pot for dyeing, I’d like to use it instead of investing for a turkey roaster. What do you think I can set the temperature for on the stove top? Low, medium high? Thanks for your help!
LikeLike
thanks for your comment. snow dyeing! just another fun thing about snow! when using the stovetop for dyeing wool, I try to always keep the temperature to a low simmer. For the snow dyeing, i might try keeping it even lower to let it melt very slowly. when it is all melted, turn it up to a simmer to finish exhausting and fixing the color.
LikeLike
Thank you for your quick response. We got some fresh snow overnight. I just covered a cotton warp with the snow for weaving this morning. I’ll try the stop top snow dyeing with wool.
LikeLike
Pingback: Snow in the forcast? | primitivespirit
Hi Karen. A well written and presented exercise. I love your turkey roaster bath. Brilliant. And so is the material you created. Thank you.
LikeLike
thank you helen for your kind words today!
LikeLike
I’m SO happy to have stumbled upon this tutorial! I’m sorry if you already mentioned this, but I was wondering the washing/drying care would be for this? Also what are your thoughts about trying this method on silk?
LikeLike
since i am using this for rug hooking, i am going for a felted finished product. otherwise hand wash cool with little agitation. experimenting with silk sounds exciting!
LikeLike
Now I cant wait to have a go, sounds fascinating, think I’ll try doing the wool roving too or skeins of spun wool
LikeLike
Wow – it’s like laying on the forest floor surrounded by flowers – looking up through the trees!
LikeLike
What a lovely effect!! Thanks for sharing this!
LikeLike
Pingback: Awesome Yarn Dying Methods
Just beautiful! This fabric would make a great coat or jacket. It looks like you have trapped Autumn in the fabric.
LikeLike