
 I love to punch hook, and one of my designs for 2013, Madame Odier, was done with this technique. When you punch hook, you are working on the back of the rug and everything will be in reverse on the right side. I find it to be a freeing technique, as you can’t see the finished side as you work, so you become more adventurous and daring.
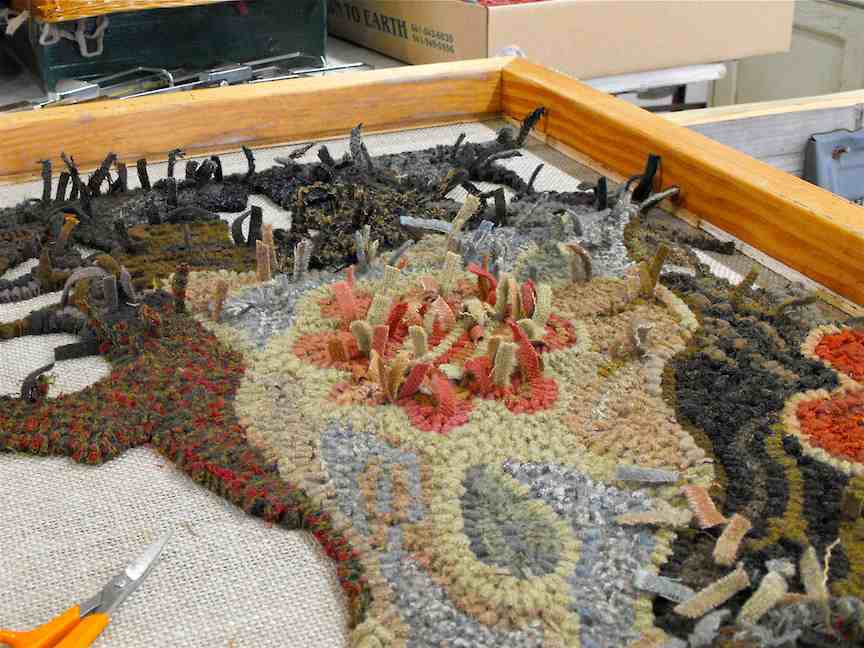
 I began this design after finishing Le Petit Chateau last winter. I tried to blog about some of my work on it without showing you too much of the design, piling wool here and there to cover it up! I did my best to hide it though it was very difficult. My concept for this rug was to create a vintage looking graphic geometric with some floral elements and interesting textures.
My design was too large to fit on a frame and still be taut and easy to reach all points, so I created a frame that is about half the size of the rug. The frame can be made with artists stretcher strips and nail carpet tack strips on the top side. After the rug is stretched taut, cover the sharp tack strips with a double thickness of wool, and tack in place with a few brads. I suspended my frame over 2 saw horses. I also like to place a large mirror on the floor to give me a view of the front of the rug as I work.

The strips for punch hooking need to be very long, otherwise you are constantly threading your hook. I use strips that are at least 60″ long, or the width of bolt wool.


Managing these long pieces of wool is important to get a handle on, as they can tangle. Some of the wool I drape over the sides of my work area, and the rest I put on this vintage drying rack.

 I use a vintage tool called a speed tufting tool made by Rug Crafters. In the 60’s this company used to have stores in shopping malls, where you could buy all you need to make a rug with yarn. You can find the tool on eBay or in thrift stores for often under $10. It is also available new from the Rug Crafters company at Yarncrafters.com for quite a bit more than that. They also sell a frame for punch hooking.
I adjust the tool so that it will make loops that are the same height that I would normally hand hook them. The setting is one of the shortest it will make. By doing this, if I decide to hook (or rehook) part of the design with the traditional method, it will blend in with my punch hooking. The tufting tool is designed to be used with yarn, however I thought it would work with wool strips. I experimented and found that it worked great with a 7 cut or 8 cut strip. Even coat weight wool can be used, just keep in mind that you will need to cut the strips skinnier, perhaps a 5 or 6 cut, to make it thin enough to glide through the tool. And, yes, you can combine yarn and cut wool yardage. I prefer the look of cut strips, but have no qualms about tossing in yarn here and there. And once you get the hang of it, you can go faster than hand hooking. However what I really like about the technique is the look. It really looks vintage, with the loops going askew. If you don’t like this look, you may not like this method.

I use primitive linen for my backing. To hook with the tool, you walk it atop the foundation cloth, similar to the technique of punchneedle embroidery except that you will be using both hands. I sometimes have several tools that I thread with different colors.
When you finish with a color, have your flush cut scissors handy, and as you lift the tool slightly off the surface, snip the thread. Then take your scissors and with the tip push all the ends to the front.
After an area is hooked solid, turn the frame over and trim the ends flush with your loops. Sometimes loops get wedged beneath the surface, so use your scissor handle to brush the loops and bring them up to be cut.

There is a learning curve with the punch tool, as you learn to walk the tip along the fabric, and make enough loops per inch. The nice thing is that it is easy to pull out mistakes, and redo your hooking. Here I have completed the first half of the rug. I then carefully take the rug off, and re-center the other half on the frame. The edge of the design that is hooked will need to be carefully tacked to the frame with brads.

I am going for a splotchy patchy background, and this works well with the tufting tool. I can go back and forth with each color creating a brush-stroke of color, like painting.


The photos above and below are the right side. The roses are a blend of several pinks, camel and off white. You are the judge as to how much you want your colors to blend. The technique is an exercise in controlled chaos.

 I often have to step back from my work to see things at the distance they will be viewed when finished. That would be 3+ feet. And then try looking at the rug from across the room. It is also helpful to take a picture of the work in progress and print it out to see it on a small scale. Ask yourself: are the splotches so distracting that they take away from the motifs and the overall composition? If so, take out the most un-blending colors and then step back and see how the updated rug looks. Repeat until you are happy with the finished design. At this point, you can rework or refine some of the design from the front if you so desire, putting it on your rug hooking frame and hooking it with the traditional method.
I loved the antique look, complete with a place or two that look as if they were “fixed” at a later time with mismatched wool. This method brings out my imagination, as I put these quirks into hooking it.
If you have found a speed tufting tool, you might want to give punch hooking a try. For the beginner, see how you like punch hooking before committing to a larger design and investing your time and money in a punch hooking frame. I recommend trying punch hooking on a small pillow-sized design that will easily fit on your traditional rug hooking frame without having to reposition it. Make sure to stretch your linen tightly on the teeth of your frame. As you punch, experiment with the spacing of loops and different cuts of wool. If you find handling the tool tricky, come back the next day and try again. Your brain and muscles sometimes need a day to figure it out. Take it slow. Have fun with this new toy. You may find that it is a nice break from hooking with the traditional method.
All designs are copyright 2013 Primitive Spirit.
Have a creative day ~ Karen
My other posts on punch hooking:
Vintage tool put to work for rug hooking


I loved this post!!! What a beautiful rug and I loved the colors!!! Thank you for starting my week off with such a wonderful post!
LikeLike
thanks for stopping by and commenting. have a great and creative week!
LikeLike
That was a great post. Thank you for sharing. I love your punch tool. Mine is a lot smaller than that! Mind you it does the job I want it to do. As usual I love your designs and the colours you use. What talented lady you are.
LikeLike
there are all kinds of punch tools. do you have the oxford punch needle?
LikeLike
Yes mine are Oxford in two different sizes. I quite enjoy needle punch although I haven’t had the chance to play with wool worms lately.
LikeLike
amy has come up with a wonderful design that is easy to thread and comfortable to punch with, and her book is full of ideas and inspiration.
LikeLike
Agree with Kathy–a beautiful rug! I enjoy doing punch needle embroidery, so maybe I would also enjoy a punch needle rug–your suggestion to make a pillow design first is a good one!
LikeLike
it is fun to experiment and see how you like it. it is quite different from traditional rug hooking.
LikeLike
So interesting! I’ve not seen that tool but have tried wool strips in the Oxford punch and sister seem so easy! Your rug is beautiful, as always, and very antique looking! Thanks for your informative post!!
LikeLike
my first punch rug was with the oxford punchneedle on monks cloth with wool strips. my arm ached after that experiment! maybe it was the monks cloth, as it is a tighter weave.
LikeLike
Good grief! ~ as I was reading new comments, I re-read mine and I see the word ‘sister’ when I thought I was typing ‘it didn’t’ seem so easy. I just love autocorrect! At any rate, rug punching with wool strips was kind of a struggle for me – you’re using the same linen we hook with?
LikeLike
hi alice, yes, i am using primitive linen for the backing. amy oxford uses monks cloth, and i found that too much of a strain on the hands. the speed tufting tool is more aggressive a tool and easier for me to use for this technique with wool strips.
LikeLike
Lovely rug. I especially the strong statement of your border treatment.
This takes me back to the 60’s!
I’m interested in the frame. Have you any photos of it showing how it has been constructed. I’ve made a smaller one about 20X20 for needlepunch using carpet strips with tacks. It would worry me to use the small frame for a larger pice, not knowing how the tacks would affect the wool.
LikeLike
hi pat, i don’t have any more photos at the moment, but i will have to post more in the days to come. you could use your small frame for a larger piece, however you would cover the tack strip on the edge that is exposed to your wool loops. then use small brad nails to attach that side of your work to the frame.
LikeLike
I have several versions of punch hooks, including an electric one which is intimidating to say the least. I need a frame that holds the backing tightly enough. I like the carpet strip idea, thanks. This post has given me the courage to try punch hooking again with wool strips.
LikeLike
very cool. i have seen the electric one at someone’s studio in vermont. yes, you would have to know what you are doing to approach that technique. every thing has a learning curve, for sure! i would love to hear more on your progress.
LikeLike
This so interesting as I have seen these rughooking tools at the flea markets, etc .but never knew how to use one. Great pattern! Lov the idea of using both rug strips & yarn..
LikeLike
thanks for your comment. yes, yarn and strips together is exciting! give it a try and see what you think!
LikeLike
Just amazing !!!!
LikeLike
What a beautiful design and finished rug !! Your style is wonderful !! this post was so much fun to read and so informative…I love step by step instructions….I’m just starting to get the hang of rug hooking by hand…..I would love to venture in this style somewhere down the road, though…So cool !
Robin
LikeLike
thank you for commenting robin! the creative journey is paramount. going at your own pace and in the direction that the energy flows is crucial.
LikeLike
I have a regular punch tool and have made a couple of small pieces with yarn. My problem is getting a frame the right size without being too big. My husband made me one for a large piece and I realized you cannot punch in your lap with large frames, lol.
Debbie
LikeLike
bigger is not better for punching frames. even for punchneedle embroidery. small makes a tighter piece to punch on. check out amy oxford’s book on punch hooking for lots of ideas and tips.
LikeLike
I echo what everyone is saying …… a marvelous post. Amy Oxford’s book is a lovely publication, but the information shared here, with pictures no less …… well I for one can’t thank you enough.
LikeLike
so happy that this post has inspired you!
LikeLike
There was a woman in Carnation many years ago that made rugs with the electric version of the tool. When her daughter heard I was hand hooking rugs she gave me her Mom’s tools. I had them for about 15 years, never tried it so gave them back… now I am intrigued. Funny thing is just last week when I was out she dropped by my house and left a note; will have to call her and see if she still has it. Oh serendipity, I love you.
LikeLike
me too! keep me informed of what happens!!!
LikeLike
What a fun post to read! I’ve done punch needle with embroidery floss but after seeing your work with wool, I’m really interested in that as well. I found a speed tufting tool for $4 so I’m going to have a go at it. Thanks for the inspiration. 🙂
LikeLike
that sounds so exciting! thanks for sharing!
LikeLike
I have a rumpleskillston(spelling is wrong) speed needle,would that work? Love your rug!
LikeLike
i am not familiar with the tool. if you are hooking with wool strips, the shaft has to be wide enough to accommodate them. that is the key. experiment! thanks for reading the blog, karen
LikeLike
It looks like an egg beater, a rug hooker Gloria something used one and she was ahead of her time as she used different fabrics in her rugs.
Kathleen
LikeLike
i am always excited to hear about people trying new ideas and innovating! thanks for sharing!
LikeLike
Wonderful post Karen, thanks so much for sharing your frame idea & demonstrating how you tackle a much larger punched rug with your special tool & strips. Beautiful colors as always that continue to inspire us…this rug is wonderful. I too have bought 2 sizes of Amy Oxford’s punch tools & have yet to “play” with them. I would much rather play with strips than yarn just because I love the “hooked” look. Great tips Karen…as always. Oh…I just remembered I inherited a “wooden handled” slide punch hook tool from one of my dear old-time rug hooker friends that I have stuffed in a box from my last move. I’ll have to look for it now to see if this one could be used for strips instead of yarn. Have you seen that type I’m talking about Karen? It is all made of wood.
LikeLike
there are a few of them out there, so i am not sure. it sounds like one i have seen, each side slides forward. i have one like that in metal but have not tried using it. so fun to experiment, i hope you will try your tool!
LikeLike
Well you did it again! You got our creative juices flowing and the possiblities are endless. I have been searching for a technique for the Monet Lily Pond photography my husband shot while we were in Paris this fall and this is the effect I wanted but didn’t know how to pull it off until I saw this. Are you reading our minds? If so, I’m thrilled. I love how you open our minds to all forms of art and give us the permission to experiment with color, style and techniques. Thank you for stretching our imagination and giving us the tools and power to play!
LikeLike
i love it when my creative passion happens to be what others find interesting. that makes my day!
LikeLike
Thanks for another inspiring post. You do a wonderful job with the pictures on your blog. I have collected a number of different older punch needle tools. Your directions as to how to use them are the best I have seen. I think I will have to try a small project! You really should do a book with a lot of the information you have posted on your blog!
LikeLike
Beautiful! And it does look antique. 🙂
I have an Oxford Punch and have only used wool yarn in it as #8 strips (the only cutter that I have) do not slide through easily. Some day I will get my hand on a #5 and try strips again. I love punching! 🙂
LikeLike
I was so sorry when Rug Crafters went out of business. It’s on my list of “to do’s” to make another rug. I owe one to someone. The trouble is I can’t find a pattern and I’m not as clever as you. I’m going to have to look at a lot of pictures and do a lot of figuring before I start it I think.
LikeLike
Pingback: Some highlights from the past | primitivespirit
I am interested in your frame…I need a large one like the one I see here…where can I get it?
LikeLike
my frame is home made. make a rectangle wood frame and nail carpet tack strips around the edges of the top side. read my blog posts on punch hooking.
LikeLike
Oxford company has frames for punch needle rug hooking . largest I have seen was 20″ x 30. They have at least 4 sizes. Google amyoxford and it should come up. I do not do punch needle but I do hook with wool strips and sometimes yarn.
Hope this helps!! Kathy in Westport, MA
LikeLike
thanks for that info kathy!
LikeLike
Love it . Do you have a DVD how to? Where to buy the hand held machine your using and supplies? I would love to do this. Thanks for info.
LikeLike
janice, thank your comment about punch hooking. i don’t have a how to for it. i may put some of the vintage tools up for sale on my etsy shop in the near future.
LikeLike
Thank you for this enlightening post. – I have been fascinated by rug hooking for decades, literally, and finally have brought all things together and done a first “practice piece”, but in yarn from native sheep. Nobody in my country seems to know this craft, so I learn as I go along (and find bits and pieces – such as yours – on the Internet). I’m quite happy with my first piece, but have to find a better way to stretch the backing.
LikeLike
yes, there are some ways to make a frame that i have shown using carpet strips. so happy to hear from you and enjoy hooking!
LikeLike
Where did you get your tufter
LikeLike
sometimes you can find them on ebay. i have some available at the moment. email me at primspirit@gmail.com if interested.
LikeLike